*This support article is intended for admins and/or instructors who have to create their own Davis Advantage class. If an admin has created and integrated an Advantage class for you, please consult our instructor "Quick-start Guide" article for further instruction.
Create Your Non-integrated Advantage Class
Please confirm with your admin whether you need to personally create your Davis Advantage class.
If an admin will not create your Davis Advantage class to integrate it within your LMS course, you can create your own non-integrated Advantage class before contacting [email protected] for further instruction on integrating that class.
To access Davis Advantage and create your Advantage class, you must first log into FADavis.com.

Log into FADavis.com with the same credentials provided by your Educational Consultant. You will not need to create a new F.A. Davis account.
If your Educational Consultant hasn't provided you with FADavis.com account credentials, please contact them and/or your program's admin.

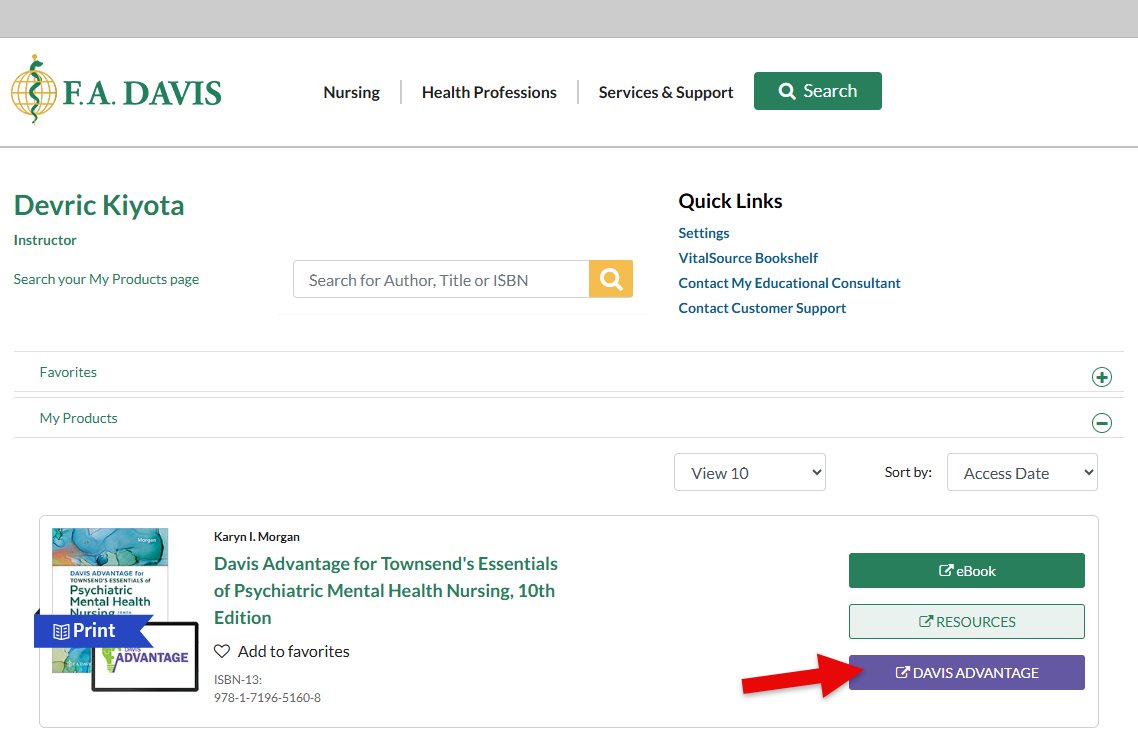
After logging into FADavis.com, you'll see your My Products page, with listings of all the F.A. Davis books and resources you have access to.
Find your textbook and click its "Davis Advantage" button.
If you can't find your textbook on your My Products page, please contact your Educational Consultant for further assistance.
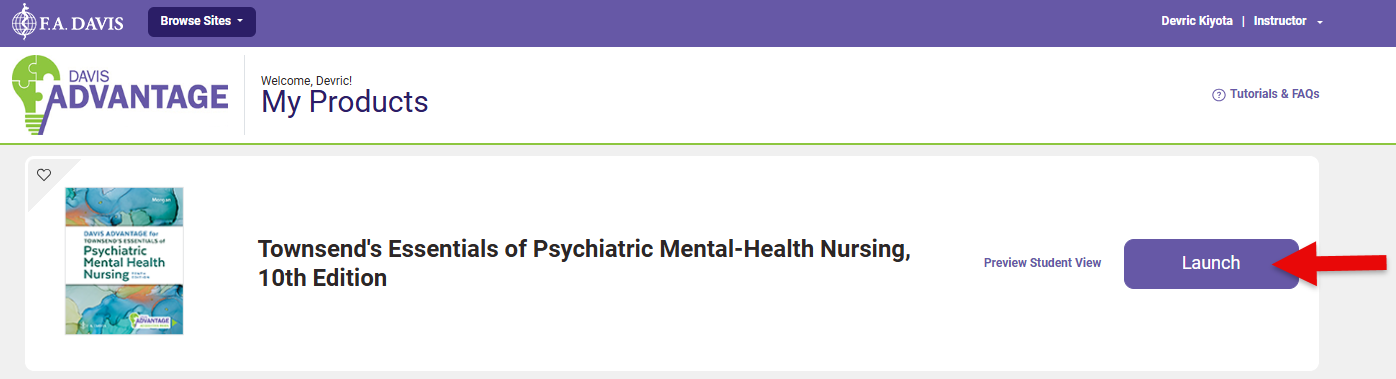
Clicking a "Davis Advantage" button will launch your Davis Advantage My Products page. On this page, you will see all the Advantage-enabled textbooks you've got access to.
On this page, find your textbook again and click its "Launch" button to navigate to your textbook's Classes page.
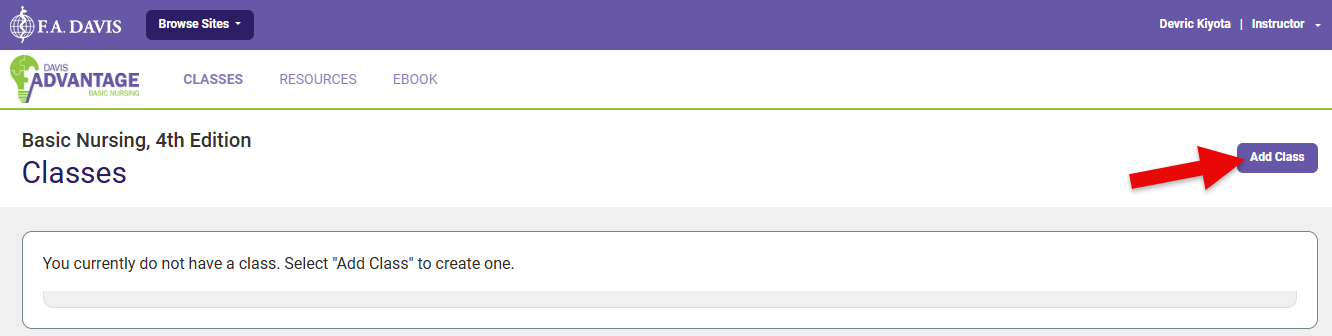
Before your Advantage-enabled textbook's Classes page houses your active and expired Advantage classes, it will start empty.
Click the "Add Class" button to launch a Class Setup, so you can begin creating your Advantage class.
Complete your Non-integrated Advantage Class Setup
On the Class Setup page, you will see a menu with six steps of adjustable course settings.
The first step, "Create Class" will primarily require entering the macroscopic details of your Advantage class, such as class name, the duration of the class via its Start and End Dates, and your time zone. We recommend giving your Advantage class the same name as the LMS course it'll be integrated with, to increase student recognition.
If you encounter a setting on the "Create Class" step, or any other step of the Class Setup, that you need to change and are unable to do so, please contact us via [email protected] so we can assist you.
On the right margin of your "Create Class" step, you'll see a link to load your Implementation Guide, which will give you more insights on how to implement Davis Advantage assignments within your syllabus.
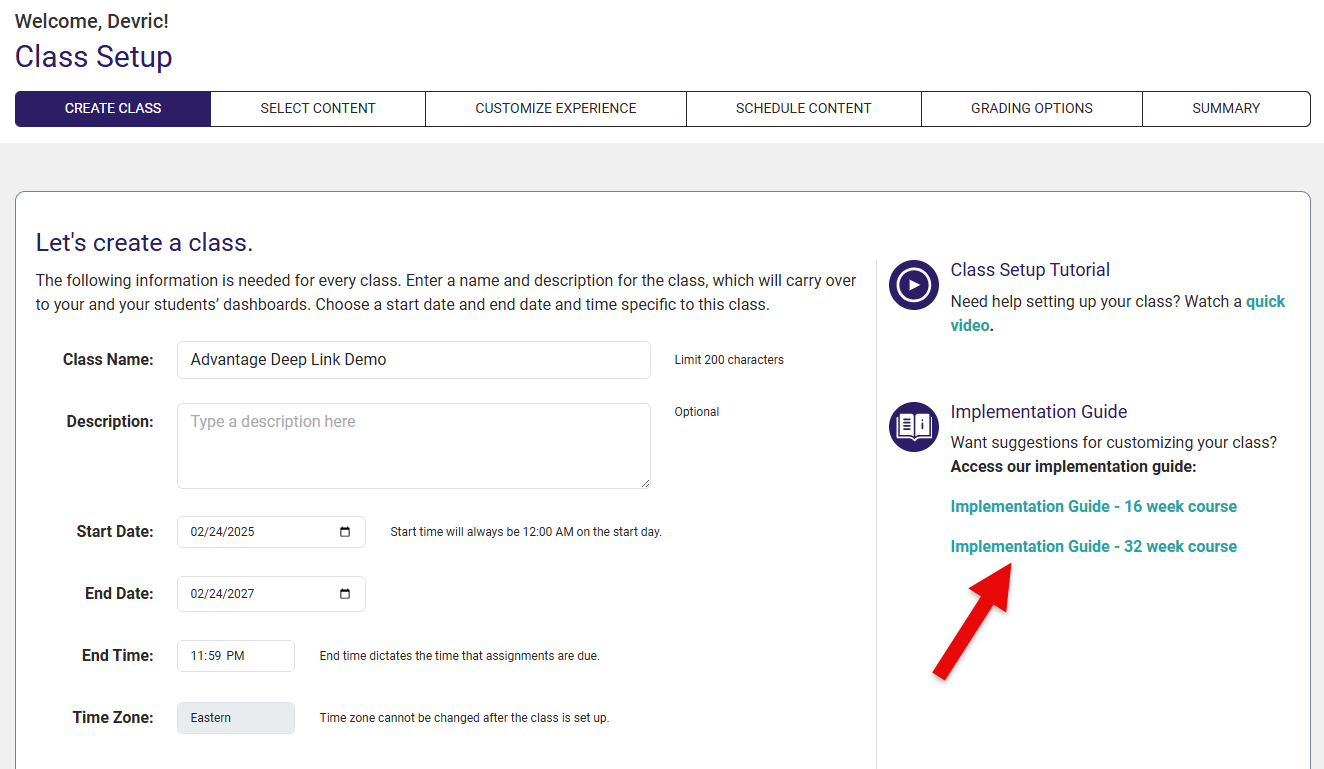
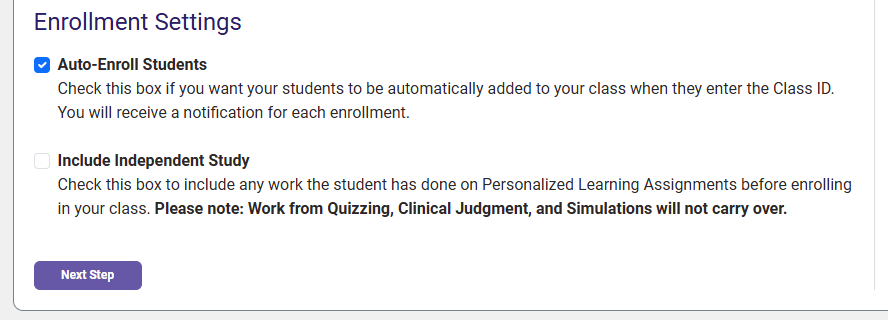
At the bottom of the "Create Class" step, please leave the "Auto-Enroll Students" checkbox checked, so the class' students will be enrolled when they launch an Advantage class link inserted into your LMS course.
Clicking the "Next Step" button saves whatever changes you made on a step of the Class Setup, in addition to progressing to the next step of the Setup.
On the "Select Content" step, you'll see a list of all the Advantage assignment topics available for your textbook. Here, the topics turned ON should match the topics that will be covered in your syllabus.
If you will not cover a topic listed on this step, please turn it OFF, so your students will only see pre-made Advantage assignments that align with what they expect to cover in-class.
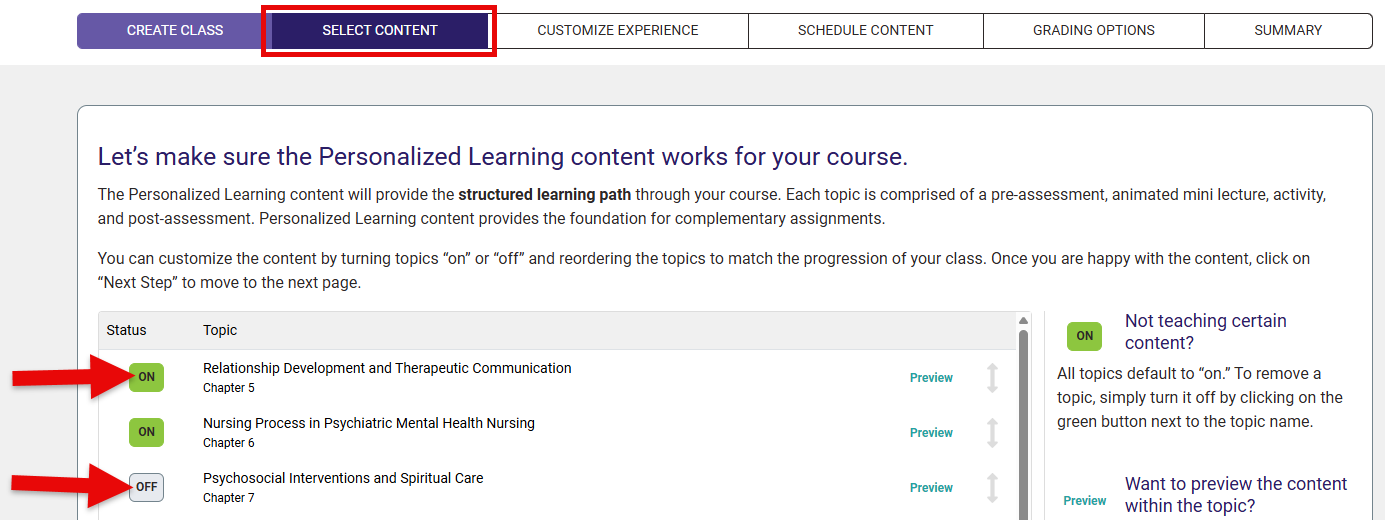
Select “Next Step” to move on.

The "Customize Experience" step of your Advantage Class Setup is where you can choose settings for assignment types you've included in your Advantage class. For more information on how students will complete assignments within Advantage, please consult our student "Assignment Types" support article.
Personalized Learning Assignments have two settings choices you can make, regarding sections of Personalized Learning Assignment content. For the "Assignment Requirements" setting, you're choosing whether students who score high on Pre-Assessments will make the rest of the Personalized Learning Assignment content optional to complete. For the "Post-Assessment Preference" setting, you're choosing how many times a student can take a Post-Assessment.
We recommend the default settings for both of these choices.

Scrolling down the "Customize Experience" step, the setting choices for Clinical Judgment and Quizzing assignments ask whether you want to automatically load in all the assignments of those types that match the topics you enabled ON during the "Select Content" step.
We recommend leaving both these settings at "Yes," to save yourself the time it would take to manually add these assignments.
Though not pictured, you'll have the same settings choice for Simulation Assignments, if using a textbook which includes Simulation assignments.

The "Schedule Content" step of your Advantage Class Setup is where you'll enter due dates for your Advantage assignments. If you want students to be penalized for late work in your course, you will need to enter assignment End Dates on this page.
If you are creating a Davis Advantage class to be copied then led by a different instructor, please inform that instructor they will need to enter due dates on the "Schedule Content" step of their cloned Advantage class. For more information, please consult our "Copying Classes" article.
Select “Set Dates,” and then click “Next Step” to see a list of assignments available in your course.

For each assignment, you will see a Start Date and an End Date. Most instructors forgo setting Start Dates, giving students the opportunity to work ahead and/or preview the content in upcoming topics.
For each End Date, select the deadline that aligns with your intended due date for that assignment. The student will still be able to access the assignment after the End Date, but any new work submitted will be flagged as late and assigned a pending grade of “0” which you can override at your discretion. For more information on late work, please see the “Advantage Gradebook Features” section of our instructor "Grading and Feedback” article.

When you are finished selecting your due dates, click “Next Step” to move on. Clicking "Next Step" here progresses your Class Setup and saves the End Dates you've entered.

On the "Grading Options" step of your Advantage Class Setup, you can choose Grading Rules for different Advantage assignment types. Please note that grading rules should be selected before students have enrolled and begun working in your course.
Information about each Grading Rule can be found on the right-hand side of this step. More information on grading can also be found in our "Grading and Feedback" article for instructors.

Personalized Learning, Simulation (where applicable), and Clinical Judgment assignments are graded based on completion. Please leave these assignments on the default "Percentage-based Participation Grade" selection, for legibility when later manually entering assignments scores into your LMS gradebook.
If you would like to make an assignment points-based or change the amount of points an assignment is worth, you can do so by editing the grade setting and point value for that assignment in your manual LMS gradebook entry.

You can choose to grade Quizzing Assignments based on completion or competency. Here, the "Percentage-based Participation Grade" selection will grade students based on completion, whereas the "Traditional Grade" selection will grade students based on how many quiz questions they get correct.
Most instructors select the "Traditional Grade" setting.

Click "Next Step" once you've decided how your Advantage assignments will be graded.

Integrate Your Advantage Class
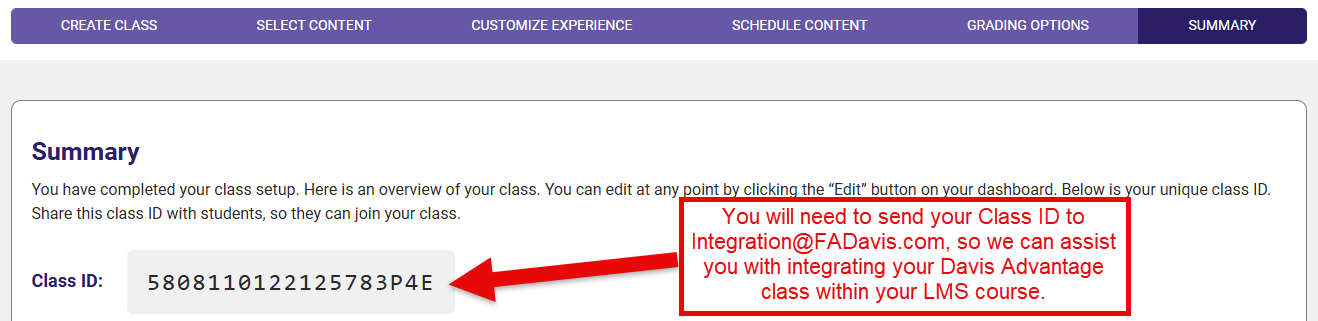
The "Summary" step of your Advantage Class Setup gives you a chance to review the settings choices you've made.
Though it instructs you to do so at the top of the "Summary" step, you won't need to share your Class ID with your students. Because your Advantage class will be integrated within your LMS course, your students will automatically enroll in your Advantage class by launching Advantage class links that will be inserted into your LMS course.
Furthermore, be advised that completing an Advantage Class Setup will not automatically integrate that class within your LMS course. Please email your Class ID to [email protected], alongside a request for more information on integrating your Advantage class within your LMS course.